
Sunday, 29 May 2011
An unexpected find - Op Art fabric
Saturday, 28 May 2011
Medicinal plants in the Sensory Garden

HUNSTANTON Sensory Garden & Bishopsgate Gardens, Manchester


Thursday, 26 May 2011
Order of Sewing for the Chevron Skirt
To get a really impressive result, pin together your centre fronts and backs, matching up the stripes and then to stop them shifting when you start machining, just take a bit of extra time to tack them together with a tacking thread as well. Machine up the front, back and right or left side seam the one without the zip (depending on which side you want your zip to be). Interface your waistband in the normal way. Sew the top seams of back and front pieces. Then sew together the sides where your zip isn't going to be, matching up the stripes as you do so. Attach the bottom of the waistband to the top of the skirt, making sure the side seam is aligned. Sew up your remaining side seam and set in a zip in the normal way, including the waistband in. You could also try it invisibly if you're feeling adventurous! Finally, hand stitch the inside edge of the waistband to the top of the skirt for a really neat finish and hem.
The Waistband of the Chevron Skirt
To make the waistband, you can either have your stripes vertical or horizontal - it doesn't really look right having them on the slant. Use your left over bits of fabric or, alternatively, a plain coloured band would work well.
 If you choose to do the striped one, cut your first piece as shown in the drawings. Use this piece as a template to cut 3 more pieces exactly the same. If you do this, for the horizontal stripes in particular, then you'll find that your stripes will meet at the sides.

Tuesday, 24 May 2011
Laying out the pattern pieces of the Chevron Skirt
Cut out your right front (1) on the slant, making your chevron as steep or shallow as you wish.
Use the right front piece you've just cut, rather than the paper pattern, as a template to cut your back left (2). Use it to get your stripes in exactly the same place.
Cut your left front (3) by placing your pattern piece roughly as shown and use your back left piece (dashed section) as a guide to where the stripes exactly go. Manouvre it a bit to make them match.
 Cut out your remaining right back exactly the same as the left front piece you've just cut (4). When you come to sew your pieces together, you will find that your side stripes will miraculously match up!
I'll explain about the waistband in the next post ...
Use the right front piece you've just cut, rather than the paper pattern, as a template to cut your back left (2). Use it to get your stripes in exactly the same place.
Cut your left front (3) by placing your pattern piece roughly as shown and use your back left piece (dashed section) as a guide to where the stripes exactly go. Manouvre it a bit to make them match.

I'll explain about the waistband in the next post ...
Pattern pieces for the Chevron Skirt

Monday, 23 May 2011
How To Make A Chevron Skirt, a la Milly Molly Mandy
I've had a few requests to explain how I managed to match up the stripes on my Milly Molly Mandy skirt. So, here's my first attempt at a tutorial. I'll be doing this over the next couple of days.
First of all, you need a roughly A Line skirt pattern where the front and back are exactly the same. I used the skirt part of the Colette Crepe dress because this has a seam down the centre front which allows for making the chevron. I used the two front pattern sections and repeated them for the back. I made the waistband from another skirt pattern, which happened to fit, but you could easily make your own by following the curve of the top of the skirt sections and tapering it slightly at the sides. You make it in two sections - a front piece and a back piece. The zip will be placed at the side of the skirt.
Ordinarily, the skirt would use a couple of metres of fabric, but to allow for stripe matching, you will need an extra metre.
I'll continue tomorrow with some diagrams of how to lay out the pattern pieces, so, until the next exciting episode, bye for now! (Sorry to keep you in suspense - I've got to go and do the drawings ...)
Friday, 20 May 2011
UK Swap Meet Part VII - Goldhawk Road
Just a few image of the Goldhawk area which itself is interesting from a historical point of view. Lots of Pie & Mash shops for example interspersed with the fabric stores ....
So comes the end to one of the best of days and it's 'bye until next time to Goldhawk Road and Station. I'm sure we won't leave it too long until the next visit ...
 |
| Some of the fabric shops and the Pie, Mash, Liquor and Eel shop (anyone??) My photo. |
 |
| Entrance to Shepherd's Bush Market. My photo. |
 |
| The original 'Bag Lady' herself! (Why didn't I leave it to one side!!) Photo courtesy of Rachel R P Silva. |
 |
| My spoils of Goldhawk Rd and the secrets stored within my bag... My photo. |
 |
| Bye' everyone! Taken by Charlotte P-B's Mum. |
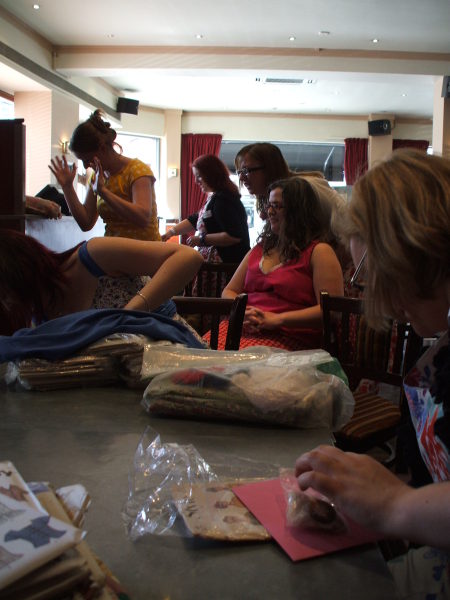
UK Swap Meet Part VI - Fabric and Pattern Swap
And so the fun begins with the pattern and fabric swap. We took over a cafe on the Goldhawk Road ... as we hadn't done this kind of thing before, it was a kind of, 'make do and mend' session. After sorting everything out into size order, the fairest way to divide up the spoils was to do a draw with several rounds. Lucky me of the larger size! (I never thought I'd ever say that ...) I could more or less choose what I wanted and am happy with my lot!
 |
| If I look a bit pale and washed out, it's because I was up the night before until midnight preparing! Don't know the photographer of this image ... |
 |
| OOh it's all so exciting!!! My photo. |
 |
| And the lucky winner is ...? Debi reading out the winning names. My photo. |
 |
| Which one should I choose??? My photo. |
UK Swap Meet V - At the Tube Station
Heading off to Goldhawk Road now and some general milling around at the tube station ...
 |
| OK - who knows where we're going?? Don't know who this photo belongs to ... |
 |
| Time to take notice of shoes! Photo courtesy Rachel R P Silva. |
Thursday, 19 May 2011
UK Swap Meet Part IV - V&A Exhibition
OK - time for action and first up the Yamamoto exhibition at the V&A. I was quite taken by an 'inside out' coat. The sleeve linings, which were striped, were attached to the outside, so, not unlike my own jacket but in an oddly creative way ..... I can never get over the practical side of my nature .... silky sleeve linings are meant to be on the inside of a coat aren't they, to help you get the coat on? Why hide the rich red wool outer? All the same, it was attention grabbing, along with the 'inside pocket' detail appearing on the outer. I'm sure Debi won't mind if I pinch her photo of the whole exhibiton to use here. The prices in the V&A gift shop prompted a swift exit to Goldhawk Road ...., though I did come away with a postcard of the 'inside out' coat ...
 |
| Debi's photo of the Yamamoto exhibition |
 |
| Some souvenirs of the day ... My photo. |
Wednesday, 18 May 2011
UK Swap Meet Part III - V&A Photo Session
After deciding to fortify ourselves with tea and cake at the V&A before doing anything else, we headed off to the courtyard cafe. Along with a chicken wrap, I was impressed with the Victoria Sponge filled with strawberries as well as cream ... Time then for another spot of photography. What a great way to record our different outfits and remember everyone we'd met. We divided ourselves into, 'tall, medium and short'. I am distinctly medium ... The overall group shots worked well, particularly with the help of Mr/Ms Pigeon - how could we have managed without him/her? Charlotte P-B's mum cleverly caught him on my camera.
 |
| Me, Kirsty and Charlotte P-B, courtesy of Sofia |
 |
| Rachel, Lauren and Sofia (my photo) |
 |
| This is terrible - I can't remember all the names - ?, Charlotte T, Amy(?), Victoria and Debi (my photo) |
 |
| Marie, Mimi and Stevie (my photo) |
 |
| Mr/Ms Pigeon et al - taken by Charlotte P-B's mum on my camera |
Tuesday, 17 May 2011
UK Swap Meet Part II - Meeting up at the V&A
 |
| Ready for the off! |

Here we are, all the Sew Weekly sewists meeting for the first time in the V&A shop. Managed to get these two images before being told off for taking photos! All are wearing their own makes - Debi is resplendent in her red 1940's style hoodie dress with Union Jack peek-a-boo lining.
Monday, 16 May 2011
Swap/Meet Dress - Colette Crepe

 |
| Taken at Butlin's holiday camp in the late 40's/50's. My mum is on the far right. |
UK Swap Meet Part I - Outfit Plans
I had a complete day of self indulgence on 14 May when I went to the Meet in London. It was so refreshing to abandon everything and just 'go' to something like this. I'd made my outfit in preparation - a denim 'blazer' type jacket and a 50's inspired roses print dress. Here's the jacket on it's own. I made it at the time of the Royal Wedding and it has red, white and blue striped details in the sleeve lining and facing, as there was lots of this kind of 'stuff' around. The denim is stretchy and very comfortable.

The photo just gives you an idea of what it's like - it's a hot day in the garden, which explains the floppy hat!

See next post for details about my dress ...
Sunday, 15 May 2011
My little 1930's jug
I love to collect old china, particularly 20's and 30's teacups and saucers, Royal memorabilia and little jugs etc... I found this one for a couple of pounds in a charity shop last week. I know it's from the 30's because my mum has a child's teacup and saucer done in the same lustre.
 |
| I like the colours in the flowers |
Wednesday, 11 May 2011
Another (pleasant) diversion ...
This little beauty arrived yesterday, all the way from Western Canada. It's my 'Sweet Skunk' pincushion, which I won on the 30 days of pincushions giveaways at Sew Weekly. It's made by 'Bluedaisies', and this is what they say at their Etsy shop:
'Welcome to Bluedaisies! There is a little bit of everything in here from vintage kitchenware, jewelry and accessories to items that I have handmade. Please enjoy your browsing and have fun!! :) Please take a look at my Sugar Deer pin cushions. Their happy retro style is unique to Bluedaisies. I have always loved vintage pose dolls and retro styled deer - these are the resulting combination of the two :) They are colourful, functional and sweet - which is why I call them Sugar Deer - I will be listing more over the summer months :)' .

I've had some great things happen to me since I joined Sew Weekly ... thanks go to Mena.
'Welcome to Bluedaisies! There is a little bit of everything in here from vintage kitchenware, jewelry and accessories to items that I have handmade. Please enjoy your browsing and have fun!! :) Please take a look at my Sugar Deer pin cushions. Their happy retro style is unique to Bluedaisies. I have always loved vintage pose dolls and retro styled deer - these are the resulting combination of the two :) They are colourful, functional and sweet - which is why I call them Sugar Deer - I will be listing more over the summer months :)' .

 |
| I think he'll be named 'Pepe Le Peu', after the cartoon skunk! |
Monday, 9 May 2011
Two more MANCHESTER images...
The drawing of the old sewing machine in the Milly Molly Mandy illustration reminded me that I had this photograph. I read somewhere that there were 10,000 of these decorating shop windows in the UK alone. Unfortunately, the store 'All Saints' is now in administration (the results of home sewing???).

 Finally, the ultimate in luxury, a Hermes scarf. This is the only photo I managed to take - there was a lovely one in pinks and blues to the right, but I found I was being stared at from within the shop for taking this one! I've always admired the drawing qualities and composition of these scarves.


Milly Molly Mandy - The Skirt ...

I meant to say in my last post that 'Milly Molly Mandy' was originally published in the 1920's and created by Joyce Lancaster Brisley, who was also a talented artist and had work hung at the Royal Academy. She made all the illustrations as well as writing the stories.
This is my finished Milly Molly Mandy pink and white striped skirt. It took some doing to work out how to match the chevron stripes all the way round. I am giving away my secret soon ....
Pretending to be Milly Molly Mandy ...
 |
| The caption reads, 'Milly-Molly-Mandy showed her frock with the tear all down the front' |
I've lots of other things to blog about that have happened in between this and the last post, but it seems appropriate to place this here in that it connects in with the pen drawings I've been doing lately. I've always loved detail and remember the 'Milly Molly Mandy' illustrations for this aspect. The skirt I've made is for a Sew Weekly challenge to create a garment inspired by a book from childhood. Milly Molly Mandy always wore pink and white stripes! I'm glad that I could combine my love of sewing with drawing ...
Thursday, 5 May 2011
Drawing again ... at last!


Wednesday, 4 May 2011
Having fun ... Kidding Around!
I'm making use of the '60's shift dress shape, edged with white ric rac, little girl sandals and a 'Mary Quant' type print motif - the flower with 5 petals!
 |
| Who needs a computer to hula hoop with?! |
Tuesday, 3 May 2011
Northern Quarter - Remaining Images
I rounded off my trip with a visit to Abakhan Fabrics and found African waxed cotton in there for a very reasonable price. Their system of selling fabric by weight can be too tempting sometimes, resulting in buying far too much, but the African prints were lovely and I'm sure I'll use it all. Photo to come.
I also enjoyed Magma Books and found a pattern cutting book in there. The Fashion Market was on too...

 |
| Abakhan Fabrics |
 |
| Fashion Market again ... |
 |
| Fashion Market |

 |
| Royal Wedding window - similar dress! |
 |
| The 70's still in evidence ... |
Subscribe to:
Posts (Atom)
Find me on Instagram
My posts have been fewer and fewer of late and so I've decided that to kick off the New Year and keep things simpler, I'll just be u...

-
 Yesterday, I finished my course at The Fashion and Textile Museum. I'm busy updating my skills - things have moved on a long way since ...
 -
 This is what I'm giving away as part of Debi's Sew Grateful week over at My Happy Sewing Place . There's a tin decorated with a...
 -
 I was going to finish a sewing project but I've been so busy at work that it just hasn't turned out that way ... instead I have the...